Digital Forensic and anti-forensic examination.

Linux based Data Recovery, & Forensic Investigation.
Recovering data is not something any IT-pro wants to face. But when the occasion arises, you may be glad Linux is around to give a helping hand.

Data recovery: The process of salvaging data from a computer when the device housing the data is inaccessible.
It is something no IT pro ever wants to have to deal with, especially within a data centre. Why? Because data recovery could mean data loss, and the implications surrounding data loss are many:
Lost revenue
Hacked, Forensic or Anti-forensic events, ransomware, or significant cybersecurity events, have compromised: data, apps, or software
Lost documentation
Lost contacts
Lost proprietary information
Lost client information
Lost time
Lost confidence
The list goes on. In the end, when something goes wrong with a system (viruses, failing hardware, ransomware, hacked, corrupt or broken operating system, etc.), it is on you to recover the precious data saved to that local drive. This could be on a desktop or a server, an end-users machine, smartphone, or the systems housing your company database/web/cloud.
During our routine work as professional IT Expert Witnesses, or software forensic Expert Witnesses, it often provides a useful toolset.
We actively help our clients recover, extract and analyse case-critical data ~
Working closely with our financial, government, business and legal sector clients we guide and identify the location and scale of key data sources.
We then advise the best method of acquiring and preserving relevant information in a forensically robust manner.
Sources can include:
email accounts;
electronic and computer devices;
document management systems;
obfuscated meta data;
and cloud storage systems.
Our industry standard plus custom-built digital forensic tools enable us to access archived or deleted data as well as live information, across many platforms and systems, legacy and advanced intelligent or futuristic apps and systems.
Our digital forensics experts carry out targeted analysis to uncover a wealth of information that can be vital to a case. This might include web and user activity, access and modification dates, hidden or obscured link files, thumb drive or external data storage activity, email chronology and printing, copying and deletion history.
Digital Forensically qualified Experts know that the forensically recovered data or assets need to comply with evidentiary requirements, and to correctly establish the data authenticity and veracity, plus chain of custody where relevant.
Our findings, signed off by a trained qualified digital forensic master, can then be used in the form of an Expert Report to support a formal legal case.
How to Unearth Assets, or Recover Data or corrupted elements ~

Recovering Data or Computer assets.
The truth of the matter is, it is not a matter of "if," but "when" you're going to wind up having to recover data. Although the cloud has made this a bit less daunting (with the ability to sync your data to cloud servers using little effort), you cannot always count on the cloud and, in some cases, you might have data you don't want hosted on a third-party server.
So when you are tasked with recovering data, where do you turn?
For many, the answer is Linux or a Unix-based system.
But how can one operating system make the recovery of data from another even possible? You might be surprised at just how easily this can be done. So long as a hard drive hasn't catastrophically failed (at which point you would be either sending that data off to a forensics specialist or accepting defeat), you can recover that data without too much hassle.
Let me explain one straightforward process. ~
Welcome to Linux Live distribution
Linux Live.
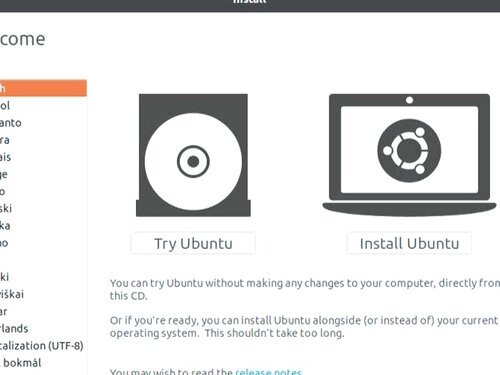
One area where Linux has shined for years is the ability to test out a Linux distribution before it is installed. This is done by way of what is called a Live distribution. How this works is simple: When you boot up a Live distribution (most modern Linux operating systems have that option) you'll see something akin to what Ubuntu offers (Figure A - on the right).
By clicking Try Ubuntu, you launch a live instance of the operating system. What does this mean? A live instance runs completely in the IT system's RAM (computer memory), so nothing is changed on the hard drive of the machine. In other words, if that machine has Windows installed on the local drive, Windows will still be “there”, but not running. [Note, if for Forensic purposes you need to capture the RAM then you need specific approaches and software, and this must be done immediately you turn the power on, or physically take the RAM out of the computer and Forensically examine ‘offline’.]
This is where Linux get very helpful.
Live instances give you access to all of the tools available on the Linux operating system, as though it were installed on the drive. That means you can mount directories, copy files, and examine in a “clean” mode.
See where this is going? If not, let me explain. Similar elements and procedures are utilised in computer expert forensic witness work.
The process of recovering data using Linux
Let's say you have a Windows 10 system that, for whatever reason, will no longer boot. You have tested the hard drive and nothing is coming up wrong, so the issue may be either the motherboard or Windows itself, or some corrupted element or artefact.
And there is data that you must have “existent” on that internal drive.
To recover that data, you burn a Linux distribution onto a flash drive (using a tool like Unetbootin), insert the flash drive in to the system in question, and boot from the flash drive. When prompted, click ‘Try Ubuntu’ (or whatever nomenclature your chosen distribution uses). Once the live instance is up and running, you then must locate the drive in question, which can be found with the command:
sudo sfdisk -lThis command will print out a list of all drives attached to the machine - similar to Figure B, below.
As you can see, in Linux, drives are labelled in the form of /dev/sdX (where X is a letter). This is where things can get a slightly complex, especially if you have multiple drives attached to the un-bootable machine, or machine to be retained in a forensically protected mode. If there is only one drive, chances are good it will be labelled: /dev/sda. If there's more than one drive, you'll probably have to take the time and mount all of the drives, until you find the data in question.
To mount a drive means you are mounting a drive to a directory, so the data is accessible. Let's do that.
First open a terminal window and create a temporary directory with the command:
sudo mkdir /dataWith the directory in place, we can mount the drive to it. Let us assume the drive is an NTFS file system, found on /dev/sdb. To mount this drive to our newly created directory, we'd issue a command like:
sudo mount -t ntfs-3g /dev/sdb1 /data -o forceWhy the 1? Because, most likely, your data is housed on the first partition - unless the drive was partitioned differently. For this, you might have to use a little trial and error, such as:
sudo mount -t ntfs-3g /dev/sdb /data -o forceor
sudo mount -t ntfs-3g /dev/sdb2 /data -o forceEventually, you'll succeed in locating and mounting the Windows drive, which means all of the containing data will be found in the newly-created /data directory. You can either use the command line or the file manager to navigate into that directory. You should then see folders such as:
Documents and Settings
Program Files
System Volume Information
WINDOWS
What to do with that data?
Once you have located the folder housing your data from the Windows drive, you can easily copy it. To do that, plug in another USB drive (leaving the one with the Live distribution in place) and click on the entry in the left pane of the file manager to mount that drive (similar to Figure C, below).
Navigate to the folder housing the data to be copied (say it is named ‘client_data’) and right-click the folder in question. Select Copy from the menu (Figure D, below).
Once the data finishes copying, navigate to the newly attached USB drive in the file manager, right-click somewhere in the right pane, and select Paste (Figure E, below).
When the data pasting has finished, you can then unmount the USB drive containing the copied data by clicking the upward pointing area associated with the drive in the file manager left-hand pane.
Congratulations, you just recovered data from an inaccessible Windows drive using Linux. Copy that data to a working machine and you are back up and running.
Forensic Investigation, Analysis and Problem Determination use very similar processes, with the added steps of making the target read-only; and then running Linux-based utilities against the: target drive, USB thumb drive/stick, server, or other defined computer facility. These steps can be used as part of computer expert Forensic Witness process, and is therefore part of the software toolkit for professional Expert Witness. Computer forensics for law enforcement runs in the same way. I will cover some elements in a later post.
Make it stand out.
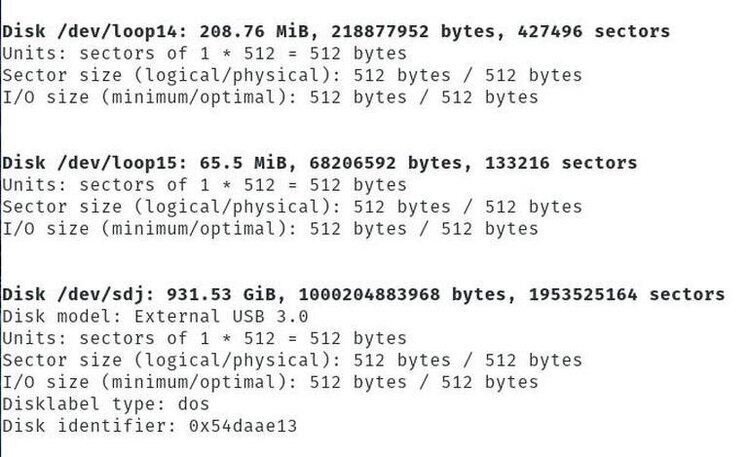
FIGURE B

FIGURE C

FIGURE D

Figure E
Figure it all out . . .

Completed Forensic Investigation
